Thursday, December 15, 2011

December 15th

Welcome to Erica's Craft Room
25 Days of Christmas,
with 25 Cricut projects a day.
Don't forget to stop by Erica's blog to see 24 more projects today....
and every day in December.


For my projects I made a card and a gift box.

My gift box is the Christmas Tree from Tags Bags Boxes and More.


I used paper with a glitter design from DCWV's Doodlin Around stack and cut the tree at 13.37 x 7.73.   I made a pouch with plastic I had laying around, filled it with glitter and then taped it inside the box.  I made a sample cut and used it as a layer inside the box to cover the glitter pouch, for a neater finish inside the box.    If I had to do this tree again, I think I would try to move the opening to the other side of the tree so you don't see where the box folds together.    I wrapped some funky yarn around the trunk of the tree then added a tag.   I used Winter Lace to cut the snowflakes at  2.10 x 2.20 and then attached them to a round circle.   I then secured it to the box with more funky yarn that I also tied around the box.

For my card I used the Christmas Cartridge and Winter Frolic.


I saw this somewhere on the internet and really liked the idea so here is my version.    I made a shaped card using the base.  I placed 2 on my Gypsy mat, sized at 5.5 H by 3.62, flipped one and welded together.   I then cut out the top layer the same size.     The presents are from Winter Lace and cut from Stampin Up Paper.   The base size was 2.40 x 2.57.

To put this together I first covered the top tree layer with Opalite Pigment Sterling Frost ink, then added embossing powders and heat set.  I then added some Studio G Red and Green Bling to the tree.   I put the presents together and attached them to the side of the tree.

I really like the idea of this card but not the finished product.   If I were to make this again, I would probably place the tree base with the present base on my mat and weld those together and then making that the welded shape card.  It stands up nicely as it is but just seems flimsy because of the tiny bit that is welded on the tree..  It might also be better suited to a larger card, mine is 4.25 x 5.5.    

I hope you are enjoying all the wonderful projects in 25 Days of Christmas Projects.

Laurie

Wednesday, December 14, 2011

December 14th

Welcome to Erica's Craft Room
25 Days of Christmas,
with 25 Cricut projects a day.
Don't forget to stop by Erica's blog to see 24 more projects today....
and every day in December.

For my project I made 2 ornaments.   The first ornaments I made using Winter Lace and Vinyl.

Vinyl is really easy to cut on the cricut, not so easy to put on a round ornament.   I found that the more delicate snowflakes were much easier to place on the ornament than the more full shaped ones.  

First I took my ornaments and filled them with Delta Creamcoat Varnish.  It is pretty thick but it works, it probably just takes a lot longer to let the varnish drip out than if you used the floor stuff.   I wasn't very patient and probably should have let the excess drip out longer.   I then poured in Martha Stewart Blue Sapphire Glitter and let it dry.

To cut out the vinyl snowflakes I used the kiss cut.   The kiss cut means you do not cut through the backing paper and that makes it much easier to work with.  I used Stampin Up Vinyl and their transfer paper.

I cut Accent 4 at 2.11 x 2.417 and Snowflake 6 at 2.22 x 2.417.   I also tried to cut Accent 6 and Star and those were a major pain to put on the ornament.   I set my expression at  Blade 3, Speed 1 and Pressure 2.   Once it is cut, you get to pick out all the tiny pieces so that the only thing left on the backing is the snowflake. I cut a piece of transfer paper to fit the snowflake and placed it sticky side down on my snowflake and went over it with my scissors handle to make sure the transfer paper was stuck to the snowflake.    Now remove the backing paper and you are ready to carefully place the snowflake on the ornament.  It works best to start from the center and work your way out.    

I then added a beaded hanger that I made a few years ago and pulled some thick silver tulle through the top of the ornament and tied a knot.

My 2nd Ornament is a Baby's First Christmas Ornament.   


I used a block from a set that I picked up at Salvation Army.   I sanded the paint to rough it up and then used  a thin coat of Modge Podge to adhere paper from Recollections Holiday Traditions 4.5 x 6.5 paper pack.   I  use pieces that are cut a bit bigger and I then cut the paper off using a finger nail file.  I like the sanded edges but I had to be more careful this time because of the photo printed on photo paper would not appreciate being sanded.   After all the pieces were attached I went over all the edges with Walnut Distress Ink.  

I then cut out a tiny 1st using A Child's Year cut at .569 x .833 welded and Stamped Christmas on the block.   The tree is from Winter Frolic (Tree 3-s) cut at 1.125 x 1.736.  I then cut 2- 2010 from George and Basic Shapes at 1.569 x .944 out of gold paper to use as a charm for the ornament.

To finish the ornament I screwed a tiny screw eye into the center of the block then attached the charm using a couple of jump rings and tied a bow and a hanger using some gold ribbon.

I'm not sure how this will hold up over time.  I would like to put a protective finish on it, but I am not sure what I should use.   If you have an idea, I would love to hear about it in a comment.

Laurie

Sunday, December 11, 2011

Dec 11th


Welcome to Erica's Craft Room
25 Days of Christmas,
with 25 Cricut projects a day.
Don't forget to stop by Erica's blog to see 24 more projects today....
and every day in December.

Today's projects are all about my favorite thing... SNOW!  I really do not think there is anything prettier than freshly fallen snow especially when it looks like this.
I love being able to look out my back windows and see this and that is my inspiration for my layout.  I also challenged myself to use one cartridge that you would not think to use for a snowy winter layout.   So I used Cindy Loo for this layout.
I used a ColorBok cardstock for the blue and the snowy background paper is from a Paper Pizazz kit.  I am sorry but I have looked everywhere and cannot find my cut file for this.   I think I might have wrote over it in CCR.   Be very careful when naming and renaming projects because if you use the same name accidentally, the first project will be gone forever.    Anyway these are the cuts I used

Serenity pg 73 - cut 2 - 1 in white to create a shadow.
Bird pg 64
Tree pg 65, I used only the shift..
Background, shadow for Doily 3 pg 70
White photo mat, Shadow for doily 1 pg 68

After cutting everything out, I used stickles, lots of them.   I traced the swirls in the background paper with Diamond Stickles.   I then used one of the sponge eye shadow applicators to paint stickles on the tree, the bird and serenity.  I use these applicators for so many things and they work great to paint with stickles.  

I then cut a blue photo mat to fit, added a bow and then adhered everything to the page.  I used pop dots on the tree and the bird to give it some dimension.

I think it turned out only ok.  It certainly doesn't do justice to the real thing!

Laurie

Friday, December 9, 2011

Dec 9th


Welcome to Erica's Craft Room
25 Days of Christmas,
with 25 Cricut projects a day.
Don't forget to stop by Erica's blog to see 24 more projects today....
and every day in December.

For today's project I made my grandson a backpack.   I remembered I had this pattern, no idea where I got it from, I might have actually copied it from something my stepdaughter had.  I looked all over the net trying to find the pattern and I cannot find it.  There are a ton of free patterns out there and a couple that are similar to this style.  Sewing was probably my first real craft.   I used to play with my mom's machine making Barbie Doll clothes from fabric scraps.   So, from my perspective, this was a very simple back pack to make.  If you sew and can put in a zipper you can do this.  


I used the dog from Boys Will Be Boys (shadow) and cut at 6.931 x 5.875.  I used the deep cut blade set at 6, multi cut 2, pressure 5 and speed 1.  The fabric is a fake suede scrap I had left over from a Halloween costume.   After ironing the fabric to the Heat and Bond and then the denim, it really feels like suede.   I was really worried that this fabric would not cut well, but it cut great.   To make the mouth and nose I played with the sizing of the dog in CCR to make the heads a similar size and then cut in paper and used it as a pattern to cut the nose, trace the mouth and placement for eyes.  I added the brown fake suede nose with embroidery thread and then sewed and glued on button eyes and made the mouth and then thought what the heck sew around the whole thing, that way it will hold up better.   It probably would have been fine without the hand stitching.   I then sewed the backpack together.  Much better than the bib I thought I was going to make.  I think this little dog would also be cute on a sweatshirt.  I would probably machine stitch around him if I were to do that.

Here it is with the books ready to put in and be wrapped for Christmas.  If you have not heard of Mo Willems, I very highly recommend his books.   The first book of his that I picked up was We Are In a Book and had to have it and it is staying at grandma's.  Very cute books but I still love Dr. Seuss too!


Hope I have inspired you to try something new or different with your Cricut machine.

Laurie

Tuesday, December 6, 2011

December 6th


Welcome to Erica's Craft Room
25 Days of Christmas,
with 25 Cricut projects a day.
Don't forget to stop by Erica's blog to see 24 more projects today....
and every day in December.

Today's theme is sports and I created a layout about my favorite winter sport, snowmobiling.

I used Potpourri Basket for the Snowflakes and A Child's Year for the photo mat.  

5.5 x 4.3 Photo mat 
Various size snowflakes approximate sizes is 2.1 x 2.3.   I just filled the page with snowflakes and then placed papers on the mat so I would have assorted colors.
Papers used are from DCWV Green pack, White is AC textured cardstock.
A snowflake punch.
I also used Karen Foster Stickers.   I love her papers and embellishments, she has the best for boys and more masculine projects.   I especially love the sentiment "The more snow the better" on the small sticker.

To make this I first made a rough design in Cricut Craft Room, sort of laying out the general placement of everything and getting the snowflakes sized.   I then cut a strip of paper to use as my starting point on the page.   Adding the mat, then the stickers to see the placement.     Now the snowflakes, I just took the ones I cut, along with the ones I punched and just layered them until I liked how it looked.   I also added gold Distress Stickles to the snowflakes to give them some dimension and sparkle.   I love how the stickles curl up the snowflakes a bit.   I then topped the snowflakes with blue, brown and gray buttons that I tied crochet thread through.  I then attached all the pieces to the background paper using my ATG gun, pop dots and Glossy Accents.   

I hope I have inspired you or given you some new ideas to use in your projects.   If you haven't thought of using crochet thread, I very highly recommend it as it is cheap and comes in assorted colors.   I also very highly recommend using Glossy Accents as adhesive on smaller pieces because if you accidentally get it in the wrong place, you don't end up with a sticky residue on your finished product.

Hope you are enjoying our projects in 25 days of projects!

Laurie


Friday, December 2, 2011

December 2nd

Welcome to Erica's Craft Room
25 Days of Christmas,
with 25 Cricut projects a day.
Don't forget to stop by Erica's blog to see 24 more projects today....
and every day in December.

Today I have a layout to show you.   I used Winter Frolic along with Recollections, ColorBok, and Coredination papers.


The 2 boys are both cut at 4 inches.   I used a white Gelly Roll pen to add some faux stitching to the boy with the snowball.   I sanded the sled to give it some dimension and added some Silver Gelly Roll pen to the skis.

Snow much fun is cut at 6.139 x3.556 and I cut one in brown to use as a shadow.  I just offset it a bit and then just the white gelly pen to add faux stitching to the word snow.

The North Pole is cut at 7.472 x 8.347.   I cut all layers except the green tree layer in the same color blue card stock.   I used the cuttlebug embossing folder with dots to add dimension to one of the 3 top pieces and then went over it lightly with stickles, I also went around the other two with stickles.    I opted to leave the North Pole off of my layout because I want to use it to put the month and year at a later time.    

I then layered a photo mat over the bottom portion of the North Pole mountains.

Winter with snow is by far my favorite season and I simply cannot wait to show my grandson just how much fun it is to play in the snow, so this layout was made with that in mind.

Don't forget to check out all the other 25 days of projects!

Laurie

Thursday, December 1, 2011

December 1st


Welcome to Erica's Craft Room
25 Days of Christmas,
with 25 Cricut projects a day.
Don't forget to stop by Erica's blog to see 24 more projects today....
and every day in December.


I am so excited to be part of 25 days in December.

I totally experimented cutting fabric with the Cricut, no idea what I was going to make or how it would turn out and I ended up with a Poinsettia Pin.

Supply list.
  1. Fabric that has been washed, dried and ironed.
  2. A sticky Mat
  3. A blade that is brand new or one that is dedicated for cutting fabric.
  4. A deep set housing blade, if you have it.
  5. An iron that you don't care if it gets gunked up.
  6. Iron on interfacing.  For this I used Steam a Seam 2 because I had it and wanted to see if it would work.
  7. Stickles
  8. Brad
  9. Pin finding, look in the jewelry area at the craft store
After preparing the fabric for cutting, I placed the fabric with the Steam a Seam down on the mat.    I used the deep set blade and my settings were Blade 6, Pressure 5, Speed 1 and Multi-cut 2.

My poinsettia is cut from the Christmas cartridge at 5.16 x 3.81.  It cut really well.   I didn't like that the back was sticky and ugly so I decided to iron my cut out pieces to the piece of fabric that was left over after cutting.   I had to hand cut the poinsettias out but it was relatively easy using the cut pieces as a guide.  So, now I had a bunch of double sided poinsettia leaves and didn't know what to do with it.   I figured it was another one of my many projects that failed and then I decided that I could probably add some dimension by folding and ironing just the tips.  Somehow I managed to not burn my fingers.  I then outlined the edge of each piece with stickles.  I sort of painted it on using and eye shadow thing.   I was going to sew this together and put on the front of a felted wool eye glass case but didn't really love that idea and decided to make a pin instead. 

To make the pin I pierced the center of each piece so I could put a brad through it and then attached the pin putting the brad through the center hole in the pin finding.  I also hand sewed the bottom piece to the pin to make sure it was secure.    I added stickles to the brad and added a few dots.

I decided that I was going to give this to my mom when I saw her at Thanksgiving and made this box to wrap up the pin.


To make the box I used the inside part of the matchbox, box from Tags Bags, Boxes and More.   I used my gypsy and put 2 on the mat, then I made one a bit smaller so it would fit together better.   The cut sizes were 6.26 x 4.65 and 6.22 x 4.62.   I used paper from a Recollections cardstock stack.

To make the bow I used the scallop border from Winter Frolic to make strips for the bow.   To do this, you have to weld 2 of the borders together flipping one so you have a scallop on both sides.  I grouped those together and copied several more that I welded together to make longer strips.  The size of the scallop border welded was 1.75 x .50, after welding more together my strips were 6.85 x .50.    To put the bow together I cut my strips as I went.   The center piece is first, you will need to punch a small hole on each end and make a loop putting a brad through both holes.   Cut the 2nd piece and make a loop and punch a hole through the center and add it to the first, then do the same with the 3rd strip.  Open the brad to secure.

I had extra of the strip so I used it along with a strip of green paper to make a paper ribbon for the box.   The red paper is from Stampin up.

I hope my project inspires you to experiment and try new things because you never know what you will end up with.   My mom loved the pin.

Laurie


Friday, November 18, 2011

Recipe and Baking Blog Hop


Welcome!   You should have come from Sheila's Blog, if not you may have missed some great inspiration and will want to start from My Cricut Craft Room so you don't miss anything awesome.


For my first project, I have started a Kid Tested Recipe Book.   My grandson is  15 months and not quite old enough yet to help grandma but definitely needs some high chair activities.  Grandma needed a break from chasing him around the house and decided to look for some fun recipes.   So I made him a very basic flour and salt play dough.   He was still a bit too young but he still liked squishing it around in his hands.   What he didn't like was the taste.  It was so funny and I didn't get a picture.   Each time I get to babysit, I am going to look for a recipe for something fun to play (make a mess) with or eat and add a new page to our recipe book.  I am putting them in a 3 ring binder that has a sleeve on the cover. I have a lot ideas that are not necessarily going to be mom approved.  :)


I purposely made my cover super simple because I plan to have Austin help me decorate it when I make finger paints.    I used Cricut Craft Room Basics to cut the letters and used the paper company value pack card stock.


I used the Font Tool for "Kid Tested" "Recipes" and cut at 1 inch.   I really like the ability to use a text box for simple text but it doesn't work well if you want to play with the placement a bit, so, the rest of the letters I didn't use the text feature and just placed them on the mat.  And is cut at .5, With is cut at .875, Grandma is cut at 1.6 and all words welded.  Austin is cut at 1.08


For my first page, again, I purposely made it super simple.   I really want to keep this album fun and really hope that Austin will want to help make pages later on.  The only cricut cut on this page is the word bubble, cut at 3.056 x 2.125 from craft room basics.  I then added a note from Austin.   I used paper from a really old pack of paper and matted the photo and recipe on red cardstock.


My next projects are also super simple.   I'm the family baker and candy maker so I'm always looking for new recipes and trying new things.  And I am super excited that I can make super simple things to package up some of my treats.   


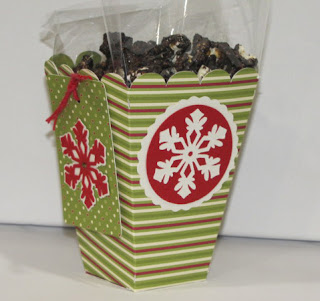
I cut the popcorn box from Tags Bags Boxes & More cut at 11.40 x 6.45.   
Scalloped circle 2.42 x 2 from A Child's Year and a 2.14 x 2 circle from George and Basic Shapes.  I then cut a snowflake from Winter Lace cut at 1.66 x 1.81.    Patterned paper is from Stampin Up, the red and cream paper is from my stash.      If you have not made boxes before they are really simple, just make sure you get a good fold and use strong adhesive.


I also made a tag from Winter Frolic cut at 2 x 3 and attached another snowflake.   On the back of the tag I will put the link to the recipe.


Chocolate Popcorn.   Super easy to make and unfortunately for me, really easy to eat. 


The treat bag is also super simple.   I used the same tag from Winter Frolic but cut at 3 x 3 and added another of the snowflakes with some red stickles for the center.  I used the little treat bags you can find in the cake decorating aisle at Michael's.   Sorry about the M & Ms, I made Chili Roasted Peanuts for my husband to take with him (boy did this week go fast) and I forgot to save some for the photo.


I really love that I will be able to make yummy treats and then make super simple and cute packaging using my expression.


I love comments and would certainly love recipes for treats or fun play recipes if you would like to share.


Don't forget to leave comments on all the blogs because I am sure Erica has something fun planned for blog candy.


Next you will go see what fantastic project Carol is sharing!   The entire lineup is posted below.


Happy Hopping
Laurie


My Cricut Craft Room- http://mycricutcraftroom.blogspot.com 
Melissa - http://pinkpolkadotscrapping.blogspot.com
Amanda - http://craftsbyamanda.blogspot.com/
Tracy - http://scrappininthewoods.blogspot.com/
Beckie - http://justbcreativecrazy.blogspot.com/
Erica- http://ericascraftroom.blogspot.com/ 
Tammy - http://thepurplemuse.blogspot.com
 Wendy - http://gilbyscraftster.blogspot.com 

Sheila - http://2pawprints.blogspot.com
Laurie - http://lauriecandoit.blogspot.com   YOU Are Here 
Carol - http://huffandpuffscrap.blogspot.com  NEXT
Blog Candy - http://ericasblogcandy.blogspot.com

Sunday, November 13, 2011

Giving Back

I hope you have enjoyed the hop we put together to say THANKS to Erica from My Cricut Craftroom.


I'm the last stop.   You should have come from Karey's Blog, If not you might have gotten lost and wish to start from the beginning with Kat's Blog.   The lineup is also posted at the end this post.

For my project, I really wanted to use the Popup Neighborhood Cartridge that I won from Erica.   My page started out as a pink and purple store with a cute little Cricut head I created using Cricut Craft Room.  And then what usually happens, happened, I couldn't find a piece of paper to match.   I spent a crazy amount of time in Joann's and didn't find anything.....except for the cutest little penguin sitting on a piece of paper with cute little snowmen and santas.     So, I decided to make a Christmas store for my layout.  


I made the store like a card and a put a photo of the prizes I had won along with a note for Erica.   All of the pages are being placed in an album for Erica.

Now I must say thanks to this great group of ladies who helped put this album and hop together.  During the past couple of days I have said many times I don't know how Erica does all this stuff.    But I am really glad that she does because since finding My Cricut Craftroom on Facebook, I have become a better paper crafter.   With her blog she provides daily inspiration and a place for crafters, like myself to display our work;  U stream videos that are not scripted, perhaps that is why they are so much fun and have been extremely helpful, and I don't want to forget what she does for others;  Cards for Operation Write Home and Project Sunshine and Smiles cards for Kids at St Jude's hospital.
I know how much time and work Erica puts in all of this and I just want to say Thanks Erica!    I know you enjoy doing all of it and then you do even more with all the prizes you give away!   I appreciate it, I know all the ladies who worked with me on this appreciate it, and I just hope everyone who has hopped with us today appreciates all your hard work as well.

I couldn't decide what to do for blog candy and finally decided another way to say thanks is to support Erica's store.   I was hoping that gift certificates would be available but they are not so what I am doing is a $10 credit to her store.  (I will paypal that to Erica when I announce the winner)   To enter, I would like you to post on Erica's facebook page something you appreciate, maybe you won a prize or are thankful for her super awesome store prices or a tip you leaned.  I will announce the winner on Erica's facebook page on Monday evening.

Thanks for hopping with us and Happy Crafting!

Laurie

http://katscrapfever.blogspot.com                   
http://papercrafteranonymous.com                 
http://grammiejudys.blogspot.com                   
www.lezlyes.blogspot.com                              
http://gscraptime.blogspot.com/                                   
http://kleymanr.blogspot.com/                     
http://cema1cema.blogspot.com                     
http://micraftygal.blogspot.com                        
http://craftsbyamanda.blogspot.com                 
http://craftyandgreen.blogspot.com                   
http://allmadebylisa.blogspot.com                 
http://kccroppers.blogspot.com                       
http://www.creativecraftcorner.com                 

Saturday, November 5, 2011

Test for comments

My blog is set for the recommended full page comment, and it is set to make it easy to comment.  

Try commenting on my post.   If it works great!   If it doesn't work please check your internet settings.

Internet Options - privacy - advanced.    You should see 2 lists of check boxes,  1 is for 3rd party cookies.   You want it to accept 3rd party cookies.

Also on the Privacy screen my setting is medium high and I don't have too many problems posting comments even when I use internet explorer.

Saturday, October 1, 2011

Oct 1-2 100 Cartridge Blog Hop


Welcome to My Cricut Craft Room's October 100 Cartridge Blog Hop, Day Two! 
If you have been hopping along you should have come from Kat's Blog.  If not you will want to start from the beginning on Erica's Blog.

I made projects about two of my favorite things snow and Halloween.  

I decided to take one image from Accent Essentials and make 2 different projects.   
First is a snowflake garland.   

I used Auto Fill on my Expression to  cut out  2 inch shadow snowflakes from white poster board.   Then I cut out the top layer in a dark navy blue cardstock.  The sparkle on the navy is extreme glitter craft paint sponged on with a make up sponge.  I adhered the navy to the white pieces and then ran a strip of ATG adhesive on half of them and attached my ribbon and then attached the other half with more adhesive.   This took a little bit of time because I sponged the paint on but other than that this is a super simple quick project to do.
So then I took the same snowflake and created a card.
The blue card front is a square from Accent Essentials and made on my gypsy.   I set it to cut at 4.75.   I then selected the same square set to cut at 2.5 and then placed it in the the center of the larger square.  You do not want to weld this smaller square as you want most of the inside square to cut.  Then I placed the shadow (shift) layer of the snowflake in the center of the card so that the edges slightly overlapped the small square.   I welded the snowflake and large square.   What you end up with should be a mostly red highlighted cut lines with just the round edges of the snowflake gray.    I then cut out the shadow snowflake in white and the snowflake in blue.      I inked the blue with embossing ink and dusted with white pearl ex to make it shimmer and finally added stickles with a make up sponge.   I attached the card front to a blue card base and added some bling to the center of the snowflake.

My next project highlights some cuts from October 31st.   The cuts from this cart are somewhat intricate and lend themselves well to making paper bag lanterns.   The haunted house is cut from Happy Hauntings.


I was having a heck of a time cutting with my new mat and completely forgot to write down cut sizes.   I think they were around 7 inches.   The bags are just cheap lunch bags filled with stones and then I dropped in the battery operated candles.

My final project is a mini album.  I used mostly Colorbok and Paper Company Value pack papers and lots of ink.  The book is 5.5 x 8.

"Enter if you Dare" is from Happy Hauntings cut at 6.19 x 4.13 and layered on top of the back for the spider frame cut at 5.28 x 7.20.   The spider web is from October 31st and was in my stash.

The tree is the 3d tree from Happy Hauntings cut at 5.01 x 4.93 and then cut in half.    The moon was cut from Plantin School book at cut at 3.21 x 3.   The witch is from HH and cut at 1.79 x 1.37.   I cut the grass from HH to fit the width of the book.  I left room on this page for a picture.  I will add the mat with the photo.

The ghost is from HH cut at 2.11 x 4.66.  The Mummy is also from HH cut at 2.98 x  3.37.   I used the tombstone with grass cut at 6.79 x 5.07.   I then added tombstones that were cut in various sizes, embellished with inks and embossing powders. The bats are from HH and October 31st and were in my stash.


I used mostly Popup Neighborhood for the fall farm pages.   The barn  3.01 x 2.89.  I then cut strips of paper and  inked them to create old barn wood.   The fence 2.9 x 1.11 and the Wagon 3.04 x 1.91.   The pumpkins and bird were from my stash.  Pumpkin patch is cut from October 31st and cut at 1.58 x 1.15.

The corn maze is cut at 5.0 x 4.45 and the scarecrow is cut at 1.64 x  3.01.   I cut this page a bit wider  and folded it to make room for a photo.
I added this sign cut at 2.55 x 4.69 and added individual cornstalks tied with a ribbon and  it doesn't show up well on the photo but there is an indian corn attached.     

I love the haunted houses on HH and October 31st, but I wanted the inside of the haunted house for my album.  I added the spider frame from HH cut at 5.28 x 7.20.  I embossed the spider web with a mix of black, gray and silver embossing powder and then added a small ghost that I embossed.

I wanted to use Summer in Paris in my Halloween album because it isn't a cartridge you would think of for Halloween but the Chandelier on SIP just looks spooky to me.   The spider web, spider, cat 1.77 x 1.55 and skeleton 1.97 x 3.90  is from Happy Hauntings.   The table is from  A Child's Year (tea party design and I cut off the extra parts to get just the table)   The chandelier is 2.31 x 2.13.  I cut out both of the 3d parts and stacked them to get some dimension then embossed with a silver and gold.   The chair from SIP is cut at 2.09 x 3.51  I cut the top layer with the the intricate cuts and then cut them out to get just the frame that I .layered on top of patterned paper  base cut. (SIP recommended cut size is about 5.5 inches).  The wine bottle and glass I cut just the base at .73 x 1.25 and then added some wine embossing powder.  The background paper is from a paper pack I got at the dollar store several years ago.   I went over it with black ink to make it spookier!

The piano is from Summer in Paris and cut at 3.73 x 3.69.  I used Happy Hauntings for Frankenstein  cut at 2.40 x 4.69 and  Bride of Frankenstein cut at 2.78 x 4.69.   The background paper is from Stampin Up and again I inked with black to make it spookier!

I used the skeleton corner border from October 31st cut at 4 inches and the Mouse from Happy Hauntings cut at 2.5 inches to frame the photo I will add later!

This is the back of the book!


I hope you have enjoyed hopping with us today!   Your next stop on the hop is Blog Candy.  If you haven't left comments on every blog, you will want to go back and do that!   The line up for Day 2 is listed below!

Thanks for hopping by!

Laurie

20.  Lucinda Gibson - http://thegrowinggibson.blogspot.com
21.  Tanya Adams -   http://nonnascraftcorner.blogspot.com
22.  Karey Jeans -  http://www.creativecraftcorner.com
24.  Gayle Schrader-  http://gscraptime.blogspot.com
27.  Lezlye    http://lezlyes.blogspot.com
30.  Lisa Newton-Orensky -  www.allmadebylisa.blogspot.com
33.  Laurie   http://lauriecandoit.blogspot.com/   <-------  You are here!